
Design & Development
Week 6:
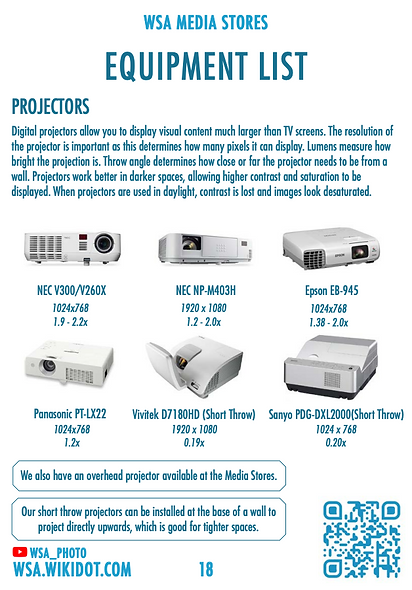
Testing Equipment
Wednesday 9th March 2022
WEEK 6 -
TO DO: TEST EQUIPMENT - PROJECTORS IN THE SPACE!
PURPOSE FOR TESTING
Today is the day we must pick up and test different projectors! The purpose for this is to explore our different options and come to a conclusion on which works best, in terms of effectiveness and purpose for the project. This will give us greater insight into how exactly we can set up the space, and ticks off our first main priority for this, allowing us to move on swiftly.
WHAT WILL I BE DOING?
We must collect equipment from the WSA Media Stores at 11am - we have the chosen equipment for a weeks time which is enough time for us to experiment with and gather the information we need. We plan to set up each projector in the way we intend for it to be used, and test with different visuals on screen to evaluate the quality of projection, gather dimensions/measurements and decide which works best.
GOALS FOR THE DAY
Collect the equipment from Media Stores, carry out a series of tests and gather information needed.
PLAN
-
11 AM - Collect two projectors, media players and cables from Media Stores.
-
Note down instructions for setup.
-
Set up first projector, evaluate with visual projection.
-
Set up second projector, evaluate with visual projection.
-
Use media players/HDMI cables - which works best?
-
Talk through decisions, move onto next priority!
TASK 1
TO DO: REQUIREMENTS
WHERE DO I BEGIN?
THE REQUIREMENTS FOR SET UP
-
3-4 Projectors that project onto flat surface/walls
-
Projectors to be linked to gameplay
-
Webcams to be placed around the space, ideally attached to or embedded into walls
-
Speakers to be placed within the space
-
Walkable space within the setup/room
IDEAL SET-UP MOCKUPS:
Can be found here: Concepts & Mockups


IDEAL SET-UP WITH EQUIPMENT:
Sketches can be found in my Sketchbook.
TASK 2
TO DO: PICK UP EQUIPMENT & DOCUMENT INSTRUCTIONS
This morning Kiera and I visited the WSA Media Stores located on the bottom floor of the East Department to collect the equipment we booked for the week. We picked up the following:
-
1 Short Throw Projector (Sanyo)
-
1 flat surface Projector
-
2 Media Players
HOW TO USE AND SET-UP THE PROJECTORS:
http://wsa.wikidot.com/estub (PDF found on WSA Media Stores site)
We were kindly lent 2 different types of projectors. Alongside these projectors we were also provided with 2 media players which allows us to play any video/image via USB connected to it, which is then connected to the projector. Next steps for us are to experiment with the setup of both projectors and evaluate which one will be better for us to use.
-
Epson EB-945
-
Sanyo PDG-DXL2000 (Short Throw)
THE SET UP
http://wsa.wikidot.com/estub (PDF found on WSA Media Stores site)


INSTRUCTIONS
-
Place Short Throw projector on the floor, with a 40cm gap around each side.
-
Ensure there are no obstructions in front of the lens.
-
Ensure the projector is level.
-
Using the remote or 'Keystone' button, adjust the settings to make image align.
-
Secure projector
-
Connect to media
-
Power off - Click power button twice.
-
Epson EB-945
-
Sanyo PDG-DXL2000 (Short Throw)
DO NOT...
-
Place objects affected by heat in front of a projector exhaust vent.
-
Look into the projector when turned on
-
Place projector on its side
-
Place next to other projectors
-
Install onto anything unstable.
-
Install near water, damp spaces, or sources of moisture.
-
Install in direct sunlight or near heat sources.
-
Install in dust, smoky, or steamy environments.
-
Install on paper, cloth, rugs, or carpet.
HOW TO: PLAYBACK
http://wsa.wikidot.com/estub (PDF found on WSA Media Stores site)
We have 2 options for playback, one being the use of media players and the other being a HDMI cable connected to a device of our choice.
PREPARING A USB FOR PLAYBACK


SETTING UP MEDIA PLAYER
http://wsa.wdfiles.com/local--files/photography/usb_media_player.pdf

FORMATTING USB FOR MAC
-
Connect the USB flash drive to Mac OS computer
-
Search for Disk Utility in Launchpad and open
-
Select the Drive and click Erase.
-
Enter new name.
-
Select MS-DOS(FAT) for format.
-
Select Master Boot Record for Scheme.
-
Click Erase.
-
Wait for loading bar - now formatted.
TASK 3
TO DO: SET UP FIRST PROJECTOR AND TEST
Now we have the instructions for setup, Kiera and I plan to test each projector and evaluate the effectiveness of its setup in terms of what we expect from our physical space, and how we plan to tie this into gameplay. To begin, we will be testing the 'SANYO Short Throw' projector.
PURPOSE FOR TEST
Firstly, we will be setting up and testing the visual projection for the SANYO Short Throw projector. We will be testing this projection to evaluate its ease of set-up/use, its quality of projection and if it matches the requirements for our physical space. From this test we must evaluate the following:
-
How easy was set-up?
-
How can we set it up to do what we want?
-
What can it project?
-
Quality of projection?
-
What are the dimensions/measurements of projection?
PROJECTOR TEST 1
Sanyo PDG-DXL2000 (Short Throw) & Media Player

WHAT DID WE DO?
Kiera and I first saw this projector in use in the East building, projecting a colourful print onto the wall. This first caught our eye because the size of the projection was perfect, as well as the placement of the projector itself. In addition to this, the quality of the projection was perfectly fine. We knew we had to get hold of this ourselves and test it.
SETTING UP OURSELVES
We made sure to place the projector in front of a blank wall with no obstructions, with 40cm around it.


ADJUSTING SETTINGS
We used the 'Keystone' button to zoom the image out, to align the image perfectly on the wall we projected onto. There were a number of other buttons such as increase and decrease volume too.


USING THE MEDIA PLAYER
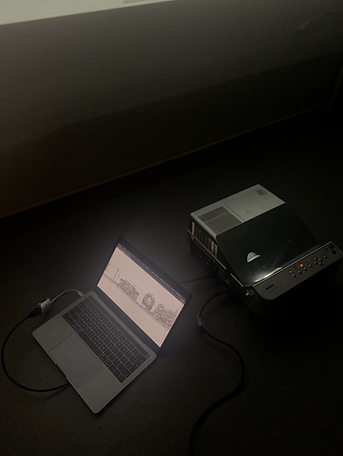
Following the 'USB Playback' steps, we formatted our USB and put on it our prototype video from last year. This was to get an idea of the sound and visual quality. We attached the USB to the media player, connected this to the projector via HDMI and used the remote to turn on.
TESTING MEDIA PLAYBACK
In the video below, I narrate the use of the projector. At first, we had trouble with the format of the video we played, and learned using the Media Player, may prove a little difficult.
ISSUES THAT OCCURED
We managed to project our choice of visuals onto the wall, after overcoming some issues. The only video that worked was an MP4 file in a specific size. We struggled to play still images or anything bigger than this size from the media player.
MEASUREMENTS:
40cm from the wall
Width of projection - 221cm
Height - 202cm
Top height when displayed - 202cm
Height of the screen - 134cm x 221cm (dimension of visuals)
FINDINGS
We found that the Short Throw Projector projected quite a large image onto the wall which we liked, so used a tape measure to measure the dimensions of the projection.

TESTING MEDIA PLAYBACK: 'Short-Trip'
We then managed to project a short clip of the game 'Short-Trip' to evaluate how hand-drawn gameplay looks displayed on a bigger scale.
ISSUES THAT OCCURED
Again, we ran into some issues with opening this on the 'File Explorer', and I eventually had to screen record the file on my Mac, compress its size and put it on the formatted USB. It took a few tries before this worked as it kept providing us with the warning 'cannot display file'.
EVALUATION OF SHORT THROW PROJECTOR WITH MEDIA PLAYER
-
How easy was set-up?
The set up of the Short Throw projector was easy, but the playback using the Media Player was not. We had to put the video of our choice on a USB beforehand and had a lot of trouble choosing the right file size and file type. We are unaware of how this would work with our game, especially if we are using more than 1 build.
-
How can we set it up to do what we want?
To set it up, we were required to format a USB with our chosen file type uploaded onto it. The USB had to be empty to avoid interference, so I am not sure how multiple files would work at a time. Once we had the USB ready, we plugged this into the Media Player, which was connected to the projector via HDMI cable. From here, we used the remote to open 'File Explorer' and select our chosen media.
-
What can it project?
The projector itself can project anything we want, however, the Media Player came with its limitations. The Media Player only works with MP4 file type.
-
Quality of projection?
The quality of projection itself was impressive. The projection of 'Short-Trip' was quite blurry however, this is a result of screen recording the game multiple times. The video we tried before that was much clearer.
-
Overall evaluation
Kiera and I felt the set up of the Media Player was a little far fetched, and we believe we would run into more problems than necessary. But, thankfully we found a solution to solve this problem in terms of playback because overall, we were very happy with the outcome of this projector.
PROJECTOR TEST 2
Sanyo PDG-DXL2000 (Short Throw) & HDMI Cable
WHAT DID WE DO?
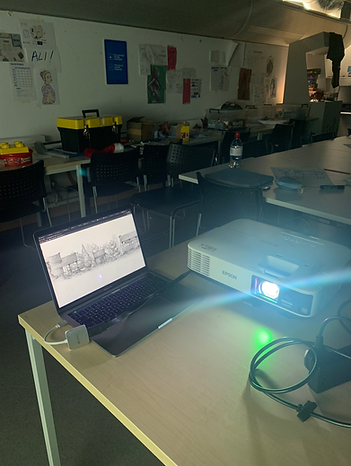
After running into some issues with our last set-up, we were determined to find another way to make things work. Instead of using the media player, we set up my laptop with a HDMI cable directly into the projector. This allowed us to project whatever was on my laptop onto the screen above.
ISSUES THAT OCCURED
The only issues we ran into with the general set up was the placement of the laptop and cables. In our physical space, it would be ideal for this laptop to be kept somewhere outside the box/space, and to not have any visible cables. To do this, it'll be necessary to get longer HDMI cables and a safe space to store the laptop.
TESTING HDMI PLAYBACK
We took the same approach as before and let the game 'Short-Trip' run on my laptop. This enabled us to see how hand-drawn visuals would look on a larger screen and to evaluate the quality of projection too.
WHAT DID WE DO?
We orchestrated the test as if Kiera was the main player and she was interacting with the screen using our newly identified method of interaction, gesture control using the palm of her hand. This video demonstrates how players will used slow controlled movement in the space, to control the bird across screens.

FINDINGS
We really liked the outcome of this projection. The art style looked great projected onto the wall and the music at the same time enhanced the experience. 'Short-Trip' has great use of ambient/nature sounds and small intricate animations which makes the game as precious as it is. We commented on the fact that we are excited to potentially get this set up on more walls as well as test gesture using a projector similar to this one.
EVALUATION OF SHORT THROW PROJECTOR WITH HDMI CABLE
-
How easy was set-up?
Set up was much easier than the first. It didn't require us to format any file, compress its size or adjust any other settings. We were much more comfortable with this set up and instantly knew of ways we could make set up look more appealing.
-
How can we set it up to do what we want?
All we needed was a laptop and a HDMI cable to connect it to the projector. This allowed us to play anything we wanted. From still images to animations. The projector also produced sound, however, its maximum volume (100) wasn't as loud as we'd like it to be. Not to worry, we can connect the laptop to a bluetooth speaker, which will perform exactly how we'd like it to.
-
What can it project?
The projector and use of HDMI can project anything of our choosing.
-
Quality of projection?
The quality of projection was as good as we'd like it to be. It was less blurry than before as we projected directly from the source rather than inputting a screen recording or copy of the media before hand.
-
Overall evaluation
Overall, we much prefer this set up and feel it could work great in the space. We are 100% confident that this setup will work with our interaction via webcam, it's just the case of considering how we might extend to 2+ screens/walls.
TASK 4
TO DO: SET UP SECOND PROJECTOR & TEST
We have documented our findings from the first projector test and now it's time to move onto the next projector we borrowed, which was the Epson EB-945.
PURPOSE FOR TEST
The purpose for this test is to evaluate its ease of setup and answer the questions below. We'd like to evaluate which setup is more convenient for what we'd like to do in the space, which will enable us to get our desired results from our player experience.
-
How easy was set-up?
-
How can we set it up to do what we want?
-
What can it project?
-
Quality of projection?
-
What are the dimensions/measurements of projection?
PROJECTOR TEST 3
Epson EB-945 and HDMI Cable.

WHAT DID WE DO?
The setup of this projector was a little different. The way this projector works is being positioned in a particular spot to project the scale of your choice. We had to place the projector on a table alongside the Mac, and position the table in a way that allowed us to project the image to a suitable size. This meant moving the table back and forth until we were happy with the placement of the image on the wall.
ISSUES THAT OCCURED
The issue with this was that we ended up losing a colossal amount of space in our walkable area. The position of the projector would be in the way of players, meaning they would have little to no space to move around. If players were to walk in front of the table, they'd obstruct the lens and the projection would be interfeed with.

FINDINGS
In this video, I talk through the pros and cons with the projector which are as follows:
-
The quality of projection is far better than the previous
-
The placement of the table/projector to the wall is too far and too obstructive, which eliminates all opportunity for players to move freely and wander their surroundings.
-
Because of this, we have concluded this setup to be ineffective and have crossed it off the list!
EVALUATION OF EPSON PROJECTOR WITH HDMI CABLE
-
How easy was set-up?
Set up was easy, the projector needed to be plugged in and turned on, with no additional setup requirements. The projection itself cannot be adjusted in terms of size/keystone which is how it differs from the SANYO Short Throw projector.
-
How can we set it up to do what we want?
Similar to the previous projector, we required a source for projection being the Mac and a HDMI cable. We could have used a Media Player again but we already concluded that this was unsuccessful. In order to project our desired scale, we had to place a table in the middle of the room which would not have worked with multiple screens and projectors.
-
What can it project?
The projector and use of HDMI can project anything of our choosing.
-
Quality of projection?
The quality of this projector was much better than the first. Although the first was still acceptable, the quality of projection was much sharper and more crisp!
-
Overall evaluation
Overall, in terms of successful setup, the first projector worked best. This test proved the difficulty of using any projector other than a 'Short Throw' projector, which enables us to place it on the floor close to the wall, out of the players way. Although the quality was better, there are more cons than pros for this option unfortunately.
REFLECTION & EVALUATION
WHAT WENT WELL?
Today, we were able to test a series of setups and come to a suitable conclusion for our final deliverable. We tested different options for playback and evaluated the effectiveness of each one. This enabled us to think about what would work best in the space in terms of the player experience, and to not affect the opportunities the player has in the space. Our final decision was clear, and made as a result of considering the user and what would work best in terms of convenience.
WHAT DIDN'T GO WELL?
We had to overcome some issues with setup but we expected this to happen. One of the projectors had to be written off before we got to test properly because of its list of limitations, but luckily we had other options. The Epson projector took up too much space and eliminated the opportunity for players to walk around the space, which is a huge part of our experience.
PROJECT PROPOSAL
In terms of our Project Proposal, we initially proposed to provide players with a 'safe space', with room for them to wander and explore consisting of 360 projections and soothing music. Because of this, we have based our decision on which setup would allow us to achieve this as it's a main part of our experience that we cannot afford to lose. To achieve our proposed idea, we must consider how exactly we go about set-up and make sure we have all the necessary parts checked off our Priority Plan to achieve a successful outcome.
DESIGN CHOICES
Taking all factors into consideration, we have chosen to go for the Sanyo PDG-DXL2000 Short Throw projector. WHY? This will allow us to setup visual projections for each wall, without losing too much space within the environment. The quality of these projectors are acceptable and the setup is more than suitable. The use of HDMI will allow us to connect a device directly to the projector, overcoming any issues with file types and formatting.
NEXT STEPS
Things to consider for final deliverable:
-
How will we hide cables?
-
Where will we place the laptop?
-
Embedding webcams?
With this choice, we have checked off one of the first priorities on our Priority Plan. Next is to use this same projector with our chosen method of interaction. It'll be necessary to connect the projector to some sort of 'webcam/image processing' demonstration to allow us to gather a better idea of how this might work. We have had a long week full of problem-solving and finding solutions again, but I feel confident knowing we now have this set in stone. By next week, we should have at least our first Game Version made, to demonstrate the core interaction first. From here, we can go about using our new choice of projector to project this onto a panel or wall.
For now, we will enjoy the weekend and start next week with a weekly discussion.